Create Slides with Marp: Finish Your Presentation in Markdown, No PowerPoint Needed
Create Slides with Marp: Finish Your Presentation in Markdown, No PowerPoint Needed
One-line verdict: Marp turns a single Markdown file into a presentation and exports it to PDF, PPTX, or HTML. Instead of fighting a design tool, you stay focused on the words — and because it’s a plain text file, your slides are version-controlled with git and can be written or edited directly by AI.

1. What Marp Is, and Why You’d Use It
Every time you build a deck, the same thing happens. The content is already in your head, yet the hours go into sizing fonts, aligning boxes, and picking colors. PowerPoint and Keynote are powerful, but they make you spend more energy operating the tool than moving thoughts onto slides.
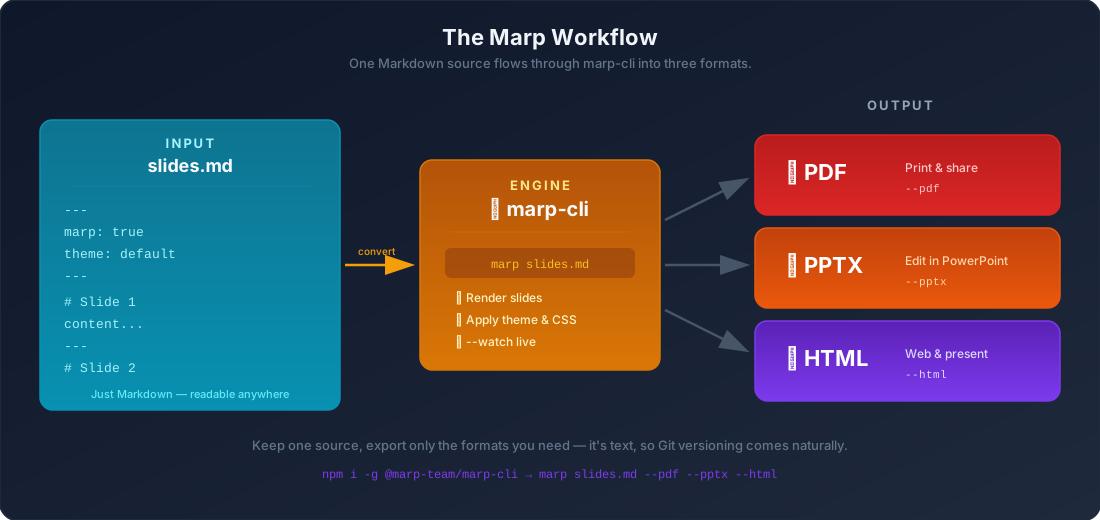
Marp (the Markdown Presentation Ecosystem) flips that order. You write your slides in Markdown, and Marp turns them into a clean, presentable deck on its own. You write text, and you get slides. The tool owns the design; you own the content.
Writing in Markdown brings a set of clear advantages:
- You focus only on the writing. Use
#for a title and-for a list, and that is your slide. Alignment, spacing, and fonts are handled by the theme. - It’s a plain text file. A single
.mdfile is the whole deck, so you can track changes with git, diff against a collaborator, and roll back to any earlier version at will — things that are painful with a binary.pptx. - It pairs well with AI. Tell a tool like Claude Code, “turn these meeting notes into a 10-slide deck,” and the AI writes the Markdown directly. That only works because the slides are text.
- Versioning and reuse are easy. A theme and structure you built once can be copied straight into your next talk.
In short, Marp rewrites the equation “a deck = design work” into “a deck = writing.” It shines exactly where the content matters most — code-review presentations, technical seminars, internal knowledge sharing.
Now that you’ve got the concept, it’s time to actually use it. We’ll start by setting up your environment.
2. Installation: Two Ways
There are two main ways to work with Marp. If you want to see results as you write, use the VS Code extension; if you need automation or batch conversion, use the Marp CLI. They aren’t competitors — they play different roles, and you’ll usually use them together.
VS Code Extension — See It As You Write
This is the easiest starting point. Search the VS Code Marketplace for “Marp for VS Code” and install it — that’s all. After installing, just add marp: true to the top of a Markdown file, and a live slide preview appears on the right side of the editor. Edit the text on the left and the slide on the right updates instantly.
It’s the most comfortable way to build your first deck, or to write with one hand while checking the layout. The export button in the preview pane converts to PDF, PPTX, and HTML right away.
Marp CLI — Automated Conversion from the Command Line
This is the tool for converting files in your terminal. It’s ideal for automation like “turn 30 slides into a PDF in one shot” or “regenerate the deck automatically in CI whenever the doc changes.” If you have Node.js installed, grab it with npm.
# Global install
npm install -g @marp-team/marp-cli

# Check the version
marp --version
If installing every time feels like overhead, you can run it once-off with npx.
# Convert directly, no install required
npx @marp-team/marp-cli@latest slides.md --pdf
The recommended flow: get a feel for things with the VS Code extension first, then automate conversion with the CLI once you’re comfortable.
With the environment ready, let’s look at how you actually write slides — Marp’s syntax.
3. Basic Syntax: How to Write a Slide
Marp’s syntax is just plain Markdown plus a few conventions. Learn the essentials and the rest is the same Markdown you already write.
marp: true — The Opening Declaration
Every Marp document starts by putting marp: true in the front matter at the very top. This one line is the switch that says, “this Markdown is a slide deck.”
---
marp: true
---

# First Slide

Write your content here.
--- — Slide Separator
The rule for splitting slides is the horizontal line, ---. Every time Marp hits a ---, a new slide begins. Just drop in a --- where the flow calls for it, and your slides grow one at a time.
---
marp: true
---

# Slide 1
Content of the first slide.

---

# Slide 2
Content of the second slide.

---

# Slide 3
Content of the third slide.
The document above becomes three slides. The only thing to remember is that the --- wrapping the front matter and the --- separating slides are the same symbol. The front matter appears exactly once, at the top; the slide separators come after it, as many as you need.
Directives — Configuring Slide Behavior
A directive is a setting that controls how a slide looks and behaves. Put it inside the front matter to apply it to the whole document, or write it as a comment mid-deck to apply it from that point on. Knowing just three common ones is plenty.
---
marp: true
theme: default      # Theme (default, gaia, uncover)
paginate: true      # Show a page number on every slide
header: '2026 Tech Seminar'   # Fixed text at the top of every slide
footer: 'Allen'               # Fixed text at the bottom of every slide
---
theme: Picks the overall design of the slides. Marp’s built-in themes aredefault,gaia, anduncover.paginate: true: Adds a page number to the corner of each slide. Handy when you want to tell the audience, “look at page so-and-so.”header/footer: Pins the same text to the top and bottom of every slide. Great for an event name, the presenter, or a date.
If you want just one slide to differ, write a directive as a comment inside that slide. Prefixing it with an underscore, like _class, applies it to that slide only.
---

<!-- _class: lead -->
<!-- _paginate: false -->

# Title Slide
This one slide is centered, with no page number.

You can build slides with the basic syntax now. Next comes making them look good — themes and custom CSS.
4. Themes and Custom CSS
Marp’s design is decided by the theme. Just changing the theme: default you saw earlier to gaia or uncover completely shifts the mood. default is a clean baseline, gaia feels warm and rounded, and uncover is a minimal, center-aligned style. Pick the one that fits your talk, then tweak the details.
You do the fine-tuning with CSS. Marp slides ultimately render as HTML, so if you know CSS, you can change font sizes, colors, and spacing however you like. The simplest approach is to drop a <style> block right inside the document.
---
marp: true
theme: default
---

<style>
section {
  background: #1a1a2e;
  color: #eaeaea;
}
h1 {
  color: #4ecdc4;
}
</style>

# Dark Theme Slide
We changed the background and text color directly.
Here, section is the selector for one entire slide. Once you know that slide = section, you can touch all the overall styling — background, margins, alignment, and so on.
If you want to reuse the same design across several talks, you can pull the styles out into a separate .css file and register it as your own theme. Declare the theme name at the top of the CSS file.
/* my-theme.css */
/* @theme my-theme */

section {
  font-family: 'Pretendard', sans-serif;
  padding: 60px;
}
You load a theme built this way with the --theme option when converting via the CLI.
marp slides.md --theme my-theme.css --pdf
The three built-in themes are enough at first. Once you’ve given a few talks and notice a “I keep changing this every time” pattern, that’s the moment to consolidate it into your own theme.
You’ve built and styled your slides — now it’s time to deliver them. Let’s look at exporting to various formats.
5. Exporting: PDF, PPTX, HTML
You convert your finished slides into whatever format fits the situation. Marp supports three main formats, each with a different use.
# PDF — the safest format for distribution. Opens anywhere, layout never breaks
marp slides.md --pdf

# PPTX — when you need to edit further in PowerPoint, or the company requires ppt
marp slides.md --pptx

# HTML — when you want to put it on the web or present straight from the browser
marp slides.md --html
The choice is simple:
- PDF: When you just want to share and be done. It looks identical regardless of the recipient’s environment. For most cases, PDF is enough.
- PPTX: When a collaborator needs to refine it in PowerPoint, or ppt is the in-house standard. Note that some CSS effects may not carry over perfectly during conversion.
- HTML: When you publish the talk as a web page, or present full-screen directly in the browser. Its strength is that it’s shared with a single link.
To process several files at once or automate, combine options.
# Watch all Markdown in a folder and convert automatically on change
marp --watch slides.md

# Specify the output file name
marp slides.md --pdf -o 2026-seminar.pdf
Leave the --watch option on and the output refreshes automatically every time you save the file, so you can iterate between writing and checking quickly.
Finishing in the Obsidian GUI — Exporting Without a Terminal
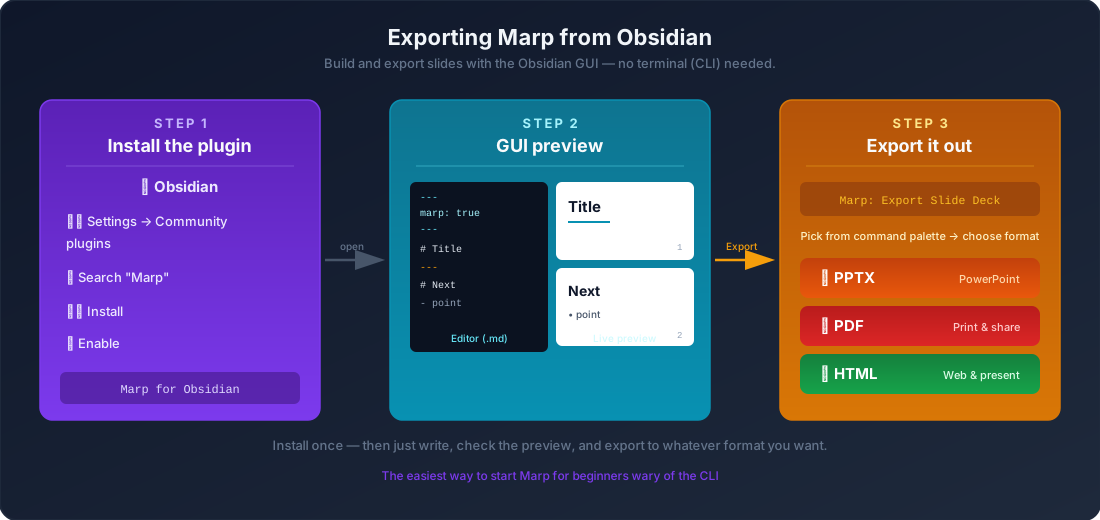
The CLI is powerful, but if you’re not comfortable in a terminal, or you already manage your notes in Obsidian, there’s an easier path. With an Obsidian community plugin you can run the whole process — write → preview → export — entirely by mouse click, with no marp-cli install. If your talk draft already lives in Obsidian, you’re pulling slides out right where you wrote them.
① Install and Enable the Plugin
First, turn on community plugins in Obsidian’s settings and grab the Marp plugin.
Settings → Community plugins → Browse
  → search "Marp" → Install → Enable
If this is your first community plugin, you’ll need to turn off “Restricted mode” before the list appears. Once you’ve enabled it, you’re ready.
② Live Preview in the GUI
Put marp: true at the top of the note you want to turn into slides, and that note becomes a target for the Marp plugin. Open the command palette and toggle the preview.
Command palette (Ctrl/Cmd + P) → run "Marp: Toggle preview"
  → slides appear live in the right-hand panel
It’s the exact same experience as the VS Code extension, right inside Obsidian. Edit the Markdown on the left and the slide on the right follows immediately, so you can polish the text and check the look on the spot.
③ Export to PPTX, PDF, or HTML
Exporting is also handled from the command palette. Pick a format, choose a save location, and you’re done.
Command palette (Ctrl/Cmd + P) → "Marp: Export slide deck"
  → choose format: PDF / PPTX / HTML
  → set save location → done
Without ever opening a terminal, you can go from writing to PPTX/PDF/HTML entirely within the Obsidian window. The note becomes the slide, and the slide becomes the distributable file.
To sum up: use the CLI when you need automation, and the Obsidian GUI when you’d rather work by hand. Both use the same Markdown file, so you can move between them as the situation demands and the output is identical.
You’ve toured all the features. Now let’s see those pieces assembled into one complete slide deck.
6. A Real Example: Start to Finish
Gather everything you’ve learned into a single file and it looks like this. Below is the full shape of a short technical talk. Copy it, convert it as-is, and you can see the behavior immediately.
---
marp: true
theme: gaia
paginate: true
header: '2026 Tech Seminar'
footer: 'Allen'
---

<!-- _class: lead -->
<!-- _paginate: false -->

# Presenting with Markdown

A 30-Minute Intro to Marp

---

## What We'll Cover

1. What Marp is
2. How to write slides
3. Exporting

> The key idea: write text, get slides.

---

## Why Markdown

- **Fast** — focus on content instead of design
- **Lightweight** — a single text file
- **Version control** — track history with git

---

## Clean Code, Too

```python
def hello():
    print("Syntax highlighting works in Marp")
```

Syntax highlighting is supported out of the box.

---

<!-- _class: lead -->

# Thank You

Questions are always welcome
Save this file as seminar.md and run the following command, and you get a presentation PDF with page numbers and the event name pinned to the top and bottom.
marp seminar.md --pdf
The title slide (_class: lead) is centered with no page number, while the body slides carry numbers plus the header and footer. It’s a great example for seeing with your own eyes how each directive shows up in the result.

Now you can build your own. To finish, a few small tips you only learn from long use.
7. Practical Tips and Wrap-Up
Even when you know every feature, you tend to get stuck on small things once you start using it for real. Here are a few worth knowing in advance.
- Adjust image size with keywords. Set width with
and height with. To lay one down as a background, use. - Don’t cram too much onto one slide. Markdown lets you write endlessly, but anything past the slide’s bounds gets cut off. One message per slide is the baseline.
- Specify fonts up front. Depending on the environment, the default font may render poorly. Set a
font-familyin custom CSS to stay safe. - Write presenter notes as comments. A comment like
<!-- presenter script here -->stays invisible on the slide while serving as a presenter note in HTML presentation mode. - Let AI draft it. Because slides are text, hand over meeting notes or a document and ask, “turn this into a Marp deck,” and the AI writes the whole Markdown draft. You just refine it.
The real value of Marp isn’t its feature list — it’s that it changes the order of work. Instead of opening a design tool first and filling a blank screen, you pour out what you want to say as text first, then let the tool dress it up. The moment your deck becomes a text file, it turns into a “code-like document” that git can manage and AI can help with.
The next time you need to build a deck, open a blank Markdown file instead of PowerPoint. Write marp: true on the first line, and from there it’s just writing.